Sunday, November 2, 2014

October Re-cap, November Plans

Hello everyone!

Welcome to November!!

October was a pretty good month for me, sewing-wise.  I completed three out of a projected amount of four finished items!  I am super happy with that because I started out the month with a series of wadders.  I was so tempted to throw in the towel and forget my whole plan, but...I put on my big girl pants (one of my co-workers used to say this all the time) and moved forward.  Sometimes you just have to go, one step at a time.  And that is what I did.

Here's what I ended up with:


So that adds two more tops and a cardigan to my wardrobe...woo hoo!  And I did still end up with a pretty good looking month, since I completed one item more than last month.

On the other hand, I still have not accomplished an entirely Me-Made outfit.  My jeans are currently in progress, and since they will probably take up most of my time for November, I only added a few additional patterns from my Fall sewing plan.

I'm going to try again on Burda 6910, View B with a lovely sweater knit I purchased from Joann's Fabrics some time ago.  The trick for this one will be doing a broad shoulder adjustment.  I also remember that there was neckline gaping, so I'll have to revisit the sizing to make sure I chose the proper one.  Don't worry, I plan on doing a muslin to avoid a lot of frustration with this one.


I also plan to try Simplicity 1463 for the first time, View A:

I saw a version on Patternreview that was just gorgeous!  Hopefully my version will turn out just as nice.

If all of that gets done (or if I just really need a pair), my "ace in the hole" will be a few pair of leggings.  I am gearing up for Fall/Winter outfits, and I only have one pair of black leggings.  A couple of weeks ago I downloaded a free pdf pattern from Spit Up and Stilettos called the Matilda Leggings, and I really want to try sewing them up.  The site has some awesome patterns for FREE! Check them out if you like.  


Here's hoping I am wildly successful in my sewing plans for this month!  I can tell you right now that November is going to be super busy for me personally.  Half the battle will be balancing the craziness with making time to sew, but I believe it can be done.  If you have any tips for how you keep your sewing mojo going during the holiday season let me know.

Also, THANK YOU all for your kind comments on my blog!  I always return every comment by email, because I appreciate you taking the time out of your day to say something to me.

Stay sew-filled!

Wednesday, October 29, 2014

Mccalls 6844 "Following the Crowd"

Hello everyone!

October is winding down, and we are still experiencing a relatively mild Fall here in Georgia.  I am truly grateful, though, because I am still cranking out garments from my Fall sewing plans.  Though I have made a dent in my plans, I have only scratched the surface of where I want to be.

Speaiking of Fall weather, I have had a cardigan on my "to-sew" list for a LONG time now--mostly because I enjoy wearing them come Fall.  My own closet consists of two RTW cardigans.  The first one is a longer gray one, and the second one is a shorter, black one.  Both of them have served me well, yet I really wanted to branch out and add some more color choices to my wardrobe.

So, I sewed the ever popular Mccalls 6844, View B, Size S:


This is a great basic cardigan, in my opinion.  I like that it has options for a peplumed version, or a waist length version.  If you need a cardigan, one of these options is likely to fit the bill.

For my version, I used a Burgundy Rayon/Lycra Jersey knit from Fabricmart Fabrics.  I got the idea from my black RTW cardigan.  Seriously!  I am a bit of a RTW sneak.  I think of what I want to sew, find a comparable RTW garment in my closet, then "sneak" in and inspect it to discover clues as to what I should do about fabric choice, etc. once I pick out a pattern.  Well, I guess it's not sneaking because I own it, but I still feel like I'm cheating in some way by observing RTW techniques : )


My adjustments are as follows:
  • 1/4" Square Shoulder (my standard nowadays)
  • Waist grading to a Medium
  • 1" Swayback Adjustment (it is looking so good now)
The construction of the cardigan was simple, and easy for a beginner to follow.  I decided to take a different route, though, and NOT use my serger. Mostly, that was due to not having matching thread, and not wanting to buy any.  I wanted the inside seams to not be glaringly obvious, so I sewed double-stitched seams with my stretch stitch, and trimmed them close.  

I also took the time to really pay attention to pressing my seams.  It was a way to practice good habits on a simple project.  I decided to interface the collar, despite the fact that other people from PR have done without it.  I reasoned that my fabric was so slinky I wanted to make sure it had a great amount of stability there.  I am glad that I did! The added weight makes it sit wonderfully.  Also, I made sure to leave a 5/8" seam allowance around the interfaced cowl piece so that it was still easy to sew together.

All of my hems were done with a narrow hem, which I really love.  It finishes off very clean.  

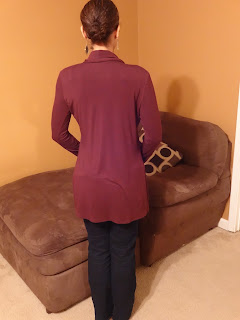
For fitting the back, I increased my swayback adjustment from 1/2" (last time) to 1", and I love the result! Take a look for yourself:


I couldn't believe how nice the back looked when I tried it on!  And no centerback seam, either!!  I have been trying out the pivot and slide method that Nancy Zieman (love her) uses in her Pattern Fitting with Confidence book, and it really works.  I admit to being a little hesitant, but it worked for my cardigan, at least, and all you are doing is decreasing the back waist length.  I'll keep tweaking this and let you know how it goes, for those of you interested.  I got her book from my local library, and the adjustment is super easy!!!

Overall, I guess hundreds of reviewers can't lie regarding this pattern.  I like it!  Oh yeah, my only other tip was that I tacked the cowl down in various places near the bottom of the garment to keep it in place.  I believe Nakisha did that on one of her versions, and I found it extremely helpful.


Let me share a little secret with all of you: I am really enjoying sewing my own clothes!!  Okay, maybe that is not a secret, but SERIOUSLY!  I have finally found out ways to make the things I sew fit much better, and I feel so good wearing them.  Even a basic tee shirt that fits you well can do wonders!  Sewing is loverly!

Now on to those jeans...

Stay sew-filled!


Wednesday, October 22, 2014

Simplicity 1916 "Orchid Dream"

Hello everyone!

Things have been looking up for me!  I started the week by working on the wadder I showed you in my previous post.  Well, I am happy to report that S1916 is no longer a wadder!  Now, granted, I will definitely have to adjust future versions of this top, but I am happy with the changes I made to make this top work.


This was my first wrap top.  I thought View A (top row, on the right) was a nice variation, but decided to go with a basic top (View D) after much thought.  I used a cotton jersey knit in Vibrant Violet from Fabric mart Fabrics.  Even though the description says jersey, though, this knit behaves in a clingy fashion.  It might have some lycra content, I'm not too sure.  Anyhow, it was a nice fabric to sew, and I mainly purchased the fabric for its stunning color.


I sewed a size 10, and made the following adjustments:
  • 1/4" Square shoulder
  • 1/2" Swayback 
  • 1" added length to hem 
  • Waist graded to size 14ish
At first, I was loving the way this top was coming together from the moment I started it.  The directions were nice and clear, my adjustments seemed to be working out well, and even my gathering looked nice (and I hate gathering).  However, as soon as I tried it on, I got some pulling at my shoulder seams!!!  I realized that I should have added a broad back adjustment to this top, and didn't even think about checking the shoulder seam length against my TNT pattern.

So...lesson learned.  I ended up playing with the sleeve allowances to add more room, but, in the end, decided to just keep them at 5/8".  The end result is not as bad as I anticipated while sewing and trying the top on.


The drag lines are mainly noticeable when I lift my arms for any reason.  Other than that, this top is great!  It is simple enough for a beginner, and the finishing on the neckline is soooo nice!!!  It is one of my favorite features of the whole top.  

To note, though, the sizing does seem to run small in this top.  With my Vogue knit top I did not need a broad back adjustment, but for this one I definitely do.  I would definitely remake this top and tweak that issue for a more comfortable fit.

Also, I ended up tacking down the front bodice pieces for modesty.  


The back has a center back seam, and fits pretty good.  For the hemming and neckline I used my stretch stitch without any problems.  I didn't use stabilizers because I decided to forgo the twin needle.  To be honest, I am finding that I prefer this method over everything I have tried.  It still gives a professional look, it is just a beast to remove if you make a mistake.  So, don't make a mistake! : )


Overall, I definitely like this one!  I guess it will come down to how irritated I get about the minimal shoulder room.  We shall see.  In the meantime, I may do another version next month.  For now, I must move on.

And I will be moving on to the repeatedly sewn Mccalls cardigan:

M6844
I will be diving straight into this one so I can finish it this week.  If all goes well, that will leave me a WEEK to get as far as I can (and maybe even finish) my jeans.

With regard to M6844, I realize that I get nervous when sewing a new pattern that I have not muslined or sewn before.  I really like to know what I am getting, or at least have an idea of how it will fit me when I am all finished.  That said, I am a little hesitant sewing this cardigan, even with all the wonderful reviews for it.  Maybe it's all of the sewing "issues" I have had this month.

Anyhow, I will press on, and see you soon with a finished cardigan!

Have a beautiful day, and stay sew-filled!


Sunday, October 19, 2014

Simplicity 1805 again "Blue Magic"

Hello everyone!!!

I am glad to be back with a finished item!  I have had a rough time the last week and a half.  It has been wadder after wadder (more on that later).  BUT, I finally came up with a winning top.  Per my hubby's request, it is Simplicity 1805 all over again.


This time I chose a casual knit from Hancock Fabrics.  It is part cotton, part polyester, and it has a slight sheen that is gorgeous.  If you look closely, you can see that it also has a little texture, similar to what is found on a slub knit.

I don't think I will take the time to go over all the details of construction for this top, since it is my second time around.  For more info, you can see the first version I made here.  I did go the extra mile for this one and added a 1/2" swayback adjustment.  Unfortunately, I didn't really notice much of a difference in the fit.  I must need more of an adjustment than that.

Suprisingly, I have already worn this top.  I wore it yesterday evening to church, and it felt wonderful on.  My only slight disappointment was stabilizing the hem with Easy Knit tape.  I realize now that no stabilizer with a stretch stitch works much better.  I need the stretch factor for my pear shape.  I will definitely take the hem out and make this change before I wear it again.  

Also, the fabric I used is slightly see-through--enough that I have to wear a tank underneath it.  But that doesn't bother me.  It is how I wear most of my shirts.


Overall, I am glad I pulled out of my wadder slump with a little "blue magic!"  And I am glad that my hubby encouraged me to make this style again.  It turns out we got to do a little matching:


And in case you are just getting familiar with me and my blog, here is a picture of my family altogether:


We definitely have a lot of fun together!

Before I go, I want to leave you with a "sneak peek" photo of S1916.  I am trying to turn this one from wadder to winner.  I will have to see how it goes.  Most of the fit is great, except where my shoulders get in the way.  I really need more shoulder room, and I am not sure if playing with the sleeve seam allowance will fix anything:


Stay sew-filled!


Saturday, October 4, 2014

September Re-cap & October Plans

Hello everyone!

I hope this weekend finds you well!  I am actually on a camping trip with my family, but I wanted to talk about what I am up to for October.

As you know, I am a planner, but I go with the flow in executing those plans.  Because of that, I don't think I've ever done any re-caps of things I have sewn during a particular month.  Let's just face it--I'm not that productive!  So please humor me as I  remind you of my September sewing.  There are only two garments I completed (and a particular pair of jeans that remain unfinished), but I'm still gonna celebrate it!

Here they are:

Left: Vogue 8536
Right: Simplicity 1805
My Vogue 8536 top has been worn once already!  I wore it to a kid's birthday party, and I felt good in it.  I didn't get any compliments on my shirt, but I did have someone tell me I looked great, so that counts, right?

I really love Simplicity 1805, but I want a pair of dress pants to go with it.  I'll have to do some peeking into my closet to see if I can come up with a good solution.  Dress pants are on my "to sew" list, though I know if I don't finish my jeans soon, I will not get to them so my dress pants will wait a bit.

But the part I am excited about is this:


I've knocked two items off my Fall sewing list!!!!!!!!!!!!  That is sooooooo big for me!  In fact, I am cleaning my closet out so that I can create a special place for my new pieces.  The best part is, I am loving all of my newest acquisitions, and they are things I WILL wear!

That brings me to my thoughts for October.  Now, let me just tell you, I am going to put it all out there, and we'll see how it all ends up when I re-cap October sewing next month.  Here goes:


Simplicity 1805, per special hubby request.  I want to try this again with a ponte knit.


Simplicity 1916 Wrap Top.  I don't know if I even have a fabric picked for this one yet, but I want to sew at least one of these (maybe two).

Mccalls 6844 Cardigan.  I plan on sewing one for sure, with possibly adding more colors if I really like it.


AND definitely finishing Mccalls 5894 Bootcut Jeans!  They are not as hard as I am making them (I think). Though I did need a breather because I was getting overwhelmed.  Now that I have had a done so, I am ready to go forward full force.

If by chance I finish everything here, I have plenty of items I can add into the mix.  But the BIG factor for me would be pulling together an entirely ME MADE outfit.  So, that is what I am focusing on in order to finish out the month of October--after I get back from camping, that is!!

Stay sew-filled!

Wednesday, October 1, 2014

Simplicity 1805 "Simply beautiful"

Good evening everyone!!!

I am at home with the kids asleep in bed, unwinding from a LONG, productive day.  My unwinding usually consists of a warm cup of tea, a small plate of dessert, and soft music or just a TV on for background noise.  Now that I am relaxed and typing...

Remember Simplicity 1805 from my last post?


Well, I think I recall saying there were only two pattern pieces (there are actually three), but that I would probably find a way to mess up even this SIMPLE pattern.  I confess. I did exactly that.

 The first time I attempted this shirt I cut up my gorgeous Maggy London Ponte Knit in Cream.  Everything was coming along well until I decided to make some adjustments.  You know, my usual square shoulder here, forward shoulder there deal.  I got stuck adjusting for a forward shoulder while sewing a dolman sleeve; however,  I thought I was a genius when I realized I could just move the seamline.  So I did.

When I tried the size S shirt on, it was much too big.  I knew then I should have sized down to an XS. No problem, I just adjusted everything the necessary amounts, only I forgot about the neckline. Which lead to this:

Left: Neckline BEFORE
Right: Neckline AFTER (noticeable gaping with movement)
NECKLINE GAPING!

I re-did the neckline four times, and just could not get it to sit right.  If I stand perfectly still, it looks great.  But when I move, you could definitely see the neckline pull away.  So, I ended up letting it go...

And instead, I tried my luck with an ITY knit I've had in my stash for a couple of months now.  This one is also from Fabricmart Fabrics.  It was a little slippery to work with, but my walking foot made things easier.


Let me tell you...this top is wonderful!!!  Not only is it simple to make--it is beautiful to wear! Hence, I like to call it "simply beautiful."  Wearing this made me realize I need more pairs of dress pants to round out my wardrobe.

S1805 Info

I sewed a size XS.  If you sew this, go with a size smaller than what you usually wear.  You can always grade the waist seams, but trust me, you want to size down for this one.

For adjustments, I only did a 1/4" square shoulder, and it fits me well.  I will probably drop my forward shoulder adjustment unless I sew more fitted woven garments.  It doesn't seem necessary.


For construction, I continued my serging efforts, and finished most of my top with it. Here are some "inside" photos for this one:

I followed the neckline instructions for this pattern, but I did not interface the band.  Also, my shoulder seams are stabilized with Easy Knit Tape.  Overall, I would HIGHLY recommend this for beginners, and anyone looking for an easy, gratifying sew.

I will definitely sew this top at least one more time, because it is worth it!!  When my husband saw me in it, he said "Wow! It looks designer, like a real top!" He even requested more of this one!  Now that is a request I don't mind honoring.


Stay sew-filled!

Thursday, September 25, 2014

Burdastyle Easy Magazine Faves and mini-update

Hello everyone!

Oh ME! Oh MY!  I hope you are having a good week!  I have been putting in lots of sewing time, yet have nothing to show for it (for now).

My S1805 top needs a bit more work and adjusting in order to get the fit tweaked.  My jeans...SIGH! My muslin looked so good y'all, and I have been fiddling with the crotch curve for the last three days, and I cannot get my butt to look like it is NOT sucking in the fabric!!  The sad part is, I don't have enough fabric to re-cut the back, as I thought I could.  Hopefully, I can get it to look decent with what I have already done.

I have been watching some Youtube videos, and came across this one, talking about a crotch curve correction.  It is supposed to help you measure your own "down there" depth, and come up with a curve tailored to your individual shape.  I hope this is my answer.  I will know soon enough.

On the good side, I am grateful for all the things I am learning.  And, I am grateful for sewing magazines that come in the mail, like the new Burdastyle Easy Autumn Winter 2014!!!!


This magazine is a step-down version of Burdastyle, geared toward the beginner sewist (or anyone needing a little more hand-holding throughout the sewing process).  There are not as many patterns in this version, but the instructions are far more detailed than Burdastyle.  It is only published twice a year, and so far, I find it to be a keeper (for me).

For now, Burda magazines seem to be an item I enjoy perusing, but have not done much else with.  I like a lot of the styles, have a LONG list of "one day I will sew them" items, but have not been able to squeak in a project yet. 

That said, here are my favorites for this one:


This fitted mini-peplum jacket is just awesome!!!  Dress it up, dress it down, dress it however you like.  I love the textured fabric they have used, but it would look great in a number of fabrics, from solid to prints.


I find this jacket to be so intriguing.  The exposed slanted zipper is unique and a fun detail.  


This Peplum blouse has a bateau neckline,and slightly extended shoulders.  It has those same slanted seams again, and the imitation leather look gives this top an edgy feel.  I really like this top, but didn't care for the way it fit the model:


Do you ever hesitate to sew a pattern when the garment looks ill-fitting on the model?  I do, but probably because if I do get into working with the pattern, and find it to be terribly drafted, I often don't know how to fix. it.


How do I love this?  Let me count the ways!  


It really has the silhouette of a sheath, but it's a jacket!!  The length is wonderful, and I love all the visual interest created on the bottom!


My last fave is this mini skirt.  Now, why you would need a total of four exposed zippers, I don't know, but I don't care!!  I think the seaming on this skirt is gorgeous (see below), and it would be very flattering.


Overall, I had more likes than dislikes for this issue, and that is always good.  In fact, that is pretty much what I aim for when deciding whether or not I will continue subscribing to a particular sewing magazine.  So, this one is a keeper.

Stay sew-filled!


Wednesday, September 17, 2014

Vogue 8536 Revisited "Psychedelic"

Hello everyone!  It is mid-week, and I have a stylish tee to show you!  Somewhere in the middle of my jeans making I realized I needed a small respite, so I could at least feel like I was making progress on my Fall sewing goals.  So, I decided to revisit a pattern I sewed earlier this year, Vogue 8536:


My version is similar to the pattern, with a few variations.  I decided to do a 3/4 sleeve in order to make this a great transition piece.  Also, there is no hem slit at the sides.  Other than that, it is the same.  

For fabric, I used an ITY knit from Fabricmart's Julie's Picks club.  This fabric was my attempt at trying something new, and stepping outside of my "box."  Woo hoo!!!  I love this fabric!  In person it has a psychedelic feel.  There is a slight sheen, and it looks so doggone luxurious.  It really makes this basic design pop!

For adjustments, I played around some more (you all know me and the fun I like to have with fit) with the pattern, and ended up with this:

Size 10
Square shoulder: 1/4"
Broad shoulder: 1/4" (Which I really did NOT need)
Forward shoulder: 1/2" (A little too much, but not noticeable)

In all my fit fiddling, I missed out on the fun of doing a swayback adjustment, but that's ok. I used Craftsy's class Custom Fitting for Back, Neck, Shoulders:


 The instructor, Kathleen Cheetham uses a slide and pivot method for most of the adjustments, and really does a great job to getting more in-depth about why certain adjustments are needed.  I have some fitting handbooks, but I was really curious about knowing the "why," so I could figure out the "what."  The last time I made this shirt, it looked great, and I wore it for the Superbowl; however, I kept getting this annoying pulling at my shoulders.  I am happy to report that this shirt does not have that annoyance factor.  When I wear it, I feel pure joy!


As a side note, I wanted to give a little construction details.  Can you believe I got my serger out for this tee????  Yes, I sure did!  I finally realized that I used to finish my projects a bit speedier because I used my serger--A LOT!  And I wasn't at all tentative about using it in the past.  In fact, I got pretty good the more I utilized it.  So, I am getting over my fear!!!  The worse that could happen is a mistake.  And even then I still have options (hint, hint, buy more fabric).  


For the neckline, I had no issues with it coming together.  However, my problem was with my twin needle.  Ugh!  I really do not like twin needles anymore.  I am just hanging in there for a coverstitch machine.  I used a stretch twin needle, loosened my tension (upper I believe), stabilized my seam, and I still got skipped stitches with a little bunching.  Thankfully, this tee is a print so you can't tell, but if this was a solid color, I would have been disappointed.  I read about trying wooly nylon thread in the bobbin, so I am going to try this next.  If you can see, I have left the hem unfinished for now, but I did get a good hem on the sleeves.  I just didn't want to risk skipped stitches on the bottom hem.

So, I bet you aren't surprise to hear me say this about V8536:


It is still a great basic shirt to make!  My only slight critique is the excess ease in the sleeve head, but that is a small issue to overcome.  There is a wrap top option in this pattern that I will probably come back to, but for now I have another top in mind.  However, I am not opposed to making this one over and over--and over again!

Before I go, I have set a deadline for my jeans to be finished by October 1st.  I will update about my jeans again soon.  I have decided to work on tops in conjunction with my jeans.  I am doing it with the hope that I can begin making a real dent in my Fall sewing plan before Fall actually gets here!

My next top choice is:


It will be View A, the top on the model on the bottom.  It has a looser fit, and 3/4 dolman sleeves (a running theme here).  I took a glance inside the pattern, and I think there are only two pattern pieces! Ha!  Usually those are the patterns I have the most trouble with!  Here's hoping for the best!

Stay sew-filled!