Hello everyone!
Today I am popping in to show you how my Sew-athon week has been going. I have been steadily sewing--not rushing through things, yet not taking too much time either.
I love a comment left in my last blog post by Natasha. She stated that she was taking the time to cut out/prepare multiple projects so that everything will be ready to sew after her Spring Break was over. I think I will do this with the projects I have left over after this week so that I can dibble and dabble on them for the rest of this month. For now let's get into how my week started...
For the first day I started on the ITS Seychelles top:
I mostly wanted to start with something familiar, since most of my Spring wardrobe patterns are new-to-me. Since I sewed the long sleeved Seychelles before, the short sleeved version made perfect sense. I chose this silky beach fabric from my Fine Fabrics haul and got busy.
Without a doubt, the pleated sleeve feature really makes this top shine:
To create the pleat, you take the two marked folds (from the pattern) and fold them toward the middle line.
Where the two folds meet, you baste the folds together for about 1.5." Then press the created fold open.
Repeat this for the other side, and Voila! You can now attach your pretty pleated sleeve!
For the second day I decided to tackle the Verna top. I received this pattern as a part of my Simply Sewing magazine subscription. As far as subscriptions go, I have been SUPER PLEASED by this one. I love the content of the magazine even though this is my first go round with their pattern.
The instructions for the Verna were so lovely! I don't recall ever seeing full color illustrations on printed paper before. I have seen that with .pdfs, but not with paper patterns. So, it was definitely a "Wow!" when I took this out. The instructions were very detailed, and I loved the way it takes you line by line, even by spelling out the items you needed to prep before sewing. I think all of these things are so beginner friendly, and lovely touches.
I used another rayon blend in a size 6 with my usual adjustments. I lengthened 1", did a 3/8" forward shoulder adjustment, and lowered the bust point by 1/2." The sleeve ties threw me for a loop, but turned out so beautifully.
Sew the sleeve right sides together, and stop the stitching at the marked notch.
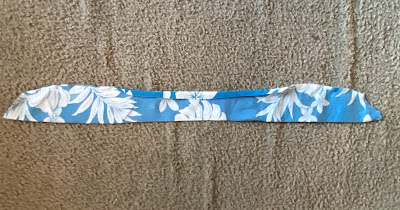
Sew the sleeve tie right sides (RS) together, leaving an opening between the notches. Press the seam allowance to the wrong side. Turn the tie to the RS.
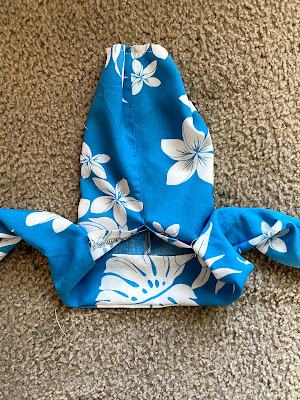
Starting at the open area of the sleeve slit, place the sleeve tie RS together onto it, and stitch.
Press the seam allowance toward the sleeve tie. The other end of the tie will now flip up and cover the seam allowance. Topstitch the upper edge of the seam to secure everything.
Here is a look at the final version:
The back has the prettiest detail! It is a slit that is closed off with a hook and eye. I sewed my first hook and eye, yet now I am probably going to change it to a thread loop and button. The hook and eye just doesn't stay closed how I like. Is this usually an issue? Other than that, I love this top!
It is going to fit well into my existing wardrobe. My only wish was that I had it finished for Easter. It seems like the perfect bright, Spring-y, Easter-y top, lol!
For day three I started a top that I did not originally intend to sew. It is one that showed up as a surprise in my mailbox, and I will share details about that in my next post. I have already finished it, yet I didn't want to overwhelm you with photos and text for today. I have been enjoying this time to sit, snack and sew. At the end of day three (Wednesday) I got my first Covid vaccine so hopefully I will continue to feel up to the pace of sewing I have set. My upcoming plan is to attack the button front Mccall's top, and prep the Burda trousers if time permits.
That's all for now! I will be back in a few days to tell you about day three and four. I hope your week is going well!
Stay sew filled!


Lovely progress no oh so wearable items! Very inspiring for spring and summer. Hook and eyes- you may need to pinch the hook closed just a little so that there is some tension when it is closed.
ReplyDeleteThank you! I will try your hook and eye tip first before I make any other adjustments! I appreciate the tip.
DeleteGreat tops, and I love the Hawaiian theme. It's not you about the hook and eye though, they work fine on a fairly stable place like a waistband, but they won't stay closed at the neckline. I'm sure you have a pretty white button ��..
ReplyDeleteThank you for sharing your experience with hook and eyes. That makes sense! A pretty white button will be my go to if I cannot get it to stay.
DeleteI love both of these! They look lovely on you. By the way, I have never been a fan of hook and eyes.
ReplyDeleteThank you! I can see why hook and eyes don’t go over well, lol!
DeleteI am envious of your beautiful fabrics. Great looking tops. I too have issues with hook and eyes. I started using invisible zippers for this type of closure, I think I use a size 7 for tops. I use them also for tops that button up the back. You are very productive for your spring break!
ReplyDeleteThank you for your feedback! I will keep this in mind. That is a smart way to avoid hook and eyes!
ReplyDelete