October is winding down, and we are still experiencing a relatively mild Fall here in Georgia. I am truly grateful, though, because I am still cranking out garments from my Fall sewing plans. Though I have made a dent in my plans, I have only scratched the surface of where I want to be.
Speaiking of Fall weather, I have had a cardigan on my "to-sew" list for a LONG time now--mostly because I enjoy wearing them come Fall. My own closet consists of two RTW cardigans. The first one is a longer gray one, and the second one is a shorter, black one. Both of them have served me well, yet I really wanted to branch out and add some more color choices to my wardrobe.
So, I sewed the ever popular Mccalls 6844, View B, Size S:

This is a great basic cardigan, in my opinion. I like that it has options for a peplumed version, or a waist length version. If you need a cardigan, one of these options is likely to fit the bill.
For my version, I used a Burgundy Rayon/Lycra Jersey knit from Fabricmart Fabrics. I got the idea from my black RTW cardigan. Seriously! I am a bit of a RTW sneak. I think of what I want to sew, find a comparable RTW garment in my closet, then "sneak" in and inspect it to discover clues as to what I should do about fabric choice, etc. once I pick out a pattern. Well, I guess it's not sneaking because I own it, but I still feel like I'm cheating in some way by observing RTW techniques : )
My adjustments are as follows:
- 1/4" Square Shoulder (my standard nowadays)
- Waist grading to a Medium
- 1" Swayback Adjustment (it is looking so good now)
The construction of the cardigan was simple, and easy for a beginner to follow. I decided to take a different route, though, and NOT use my serger. Mostly, that was due to not having matching thread, and not wanting to buy any. I wanted the inside seams to not be glaringly obvious, so I sewed double-stitched seams with my stretch stitch, and trimmed them close.
I also took the time to really pay attention to pressing my seams. It was a way to practice good habits on a simple project. I decided to interface the collar, despite the fact that other people from PR have done without it. I reasoned that my fabric was so slinky I wanted to make sure it had a great amount of stability there. I am glad that I did! The added weight makes it sit wonderfully. Also, I made sure to leave a 5/8" seam allowance around the interfaced cowl piece so that it was still easy to sew together.
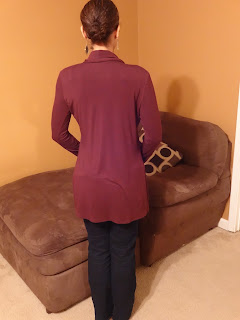
For fitting the back, I increased my swayback adjustment from 1/2" (last time) to 1", and I love the result! Take a look for yourself:
I couldn't believe how nice the back looked when I tried it on! And no centerback seam, either!! I have been trying out the pivot and slide method that Nancy Zieman (love her) uses in her Pattern Fitting with Confidence book, and it really works. I admit to being a little hesitant, but it worked for my cardigan, at least, and all you are doing is decreasing the back waist length. I'll keep tweaking this and let you know how it goes, for those of you interested. I got her book from my local library, and the adjustment is super easy!!!
Overall, I guess hundreds of reviewers can't lie regarding this pattern. I like it! Oh yeah, my only other tip was that I tacked the cowl down in various places near the bottom of the garment to keep it in place. I believe Nakisha did that on one of her versions, and I found it extremely helpful.
Let me share a little secret with all of you: I am really enjoying sewing my own clothes!! Okay, maybe that is not a secret, but SERIOUSLY! I have finally found out ways to make the things I sew fit much better, and I feel so good wearing them. Even a basic tee shirt that fits you well can do wonders! Sewing is loverly!
Now on to those jeans...


