Friday, June 30, 2017

Using Tailor Tacks for a Successful Garment

Hello everyone!

Here we are at the end of June, and I am still working on my shirt dress!  I am oh, so close to finishing, and will show you a sneak peek TODAY, but...first I wanted to share a few things with you:


Yesterday was a special day for me!  It was my birthday!  I happily got to spend it with my family.  In fact, my hubby worked a half day so he could take us all out to eat.  In our family, the person who has a birthday gets to choose where they would like to eat.  For some reason, the last two birthdays we celebrated were at Carrabbas (which I LOVE). However, there was no way I wanted to pick that for my day.  So, a trip to The Cheesecake Factory was in order!

I had a wonderful early dinner, and the tastiest low carb cheesecake with strawberries:


Our server Megan was awesome, and I even got a birthday song!  I must say, I had a wonderful day. And the older I get, the more I count my blessings!  Just 3 years ago I had a minor health crisis (heart-related) that changed my life and my eating habits forever.  It made me pay more attention to how I was treating my body, and was a clear enough warning that change was necessary.  

Now, I am delighted when I look around and see my family looking back at me--especially our youngest, who will be ONE in a few weeks!  God has been faithful, and I am GRATEFUL!!!

While I celebrated my day yesterday, I am also celebrating a new sewing discovery--tailor tacks!!  I have been knee-deep in shirtmaking (LOL) and delving into it through Craftsy.  One of those things is how to make speedy tailor's tacks.


My first impression on hearing about them through Pam Howard's Craftsy Classic Tailored Shirt class was to eye-roll and think, "it doesn't really take all that."  Yet even though my first response was apprehensive, I decided to give them a try.  If I hated it, I could always go back to my own method of marking, right?

Well, it turns out that I LOVE tailor's tacks!!!  Here are some questions I had, and what I found:

What are they for?
They are especially handy for thread-marking your fabric, so that you do not have to use marking tools, or distort the fabric in any way.  In fact, before there were marking tools, there were tailor's tacks!  I like that they reliably place your markings in a quick and easy way.

Do they take a lot of time to put in?
NO, not at all! Thread your needle, and you are ready to go!  You can even accurately thread mark two pattern pieces at once.I was worried about how much time they would take to put in, but it probably took as much time to do as it would for me to mark my fabric the way I usually do (with chalk or fabric pens).

How do you use them once you put them in?
Here is the part I thought would be difficult.  But, you know what?  I have found that the tacks made sense as I am began to construct my garment.  For example, on the shirt front for my shirt dress, I used them to indicate the foldlines (as well as small notches on the bottom), and I was pleased to see how everything lined up when I went to create the button band.  

For a short video tutorial about the process, click HERE. I hope you find tailor's tacks as helpful as I have!  If you already use them, let me know!

SNEAK PEEK OF MY SHIRT DRESS

Fitting, Buttonholes, Hemming, and Bias Binding still needed!


Stay sew filled!


Thursday, June 22, 2017

Mystery of the Shirt Dress Muslin Solved!

Hello everyone!

I am back with an updated muslin to show you. Since my last post I made a few adjustments and changes to make my Threadcount 1607 Shirt Dress fit much better.  Here are the results:
6 inches of length removed
Binding applied to right shoulder

Same changes with a small
tie belt from my closet


I really liked the direction my shirt dress was headed after I made all these changes.  However, there were still a few things that bothered me.  For one, the armhole of my shirt was still pretty huge, even after applying my binding.  I would have to raise it by 1.5 inches!!  How is that possible?


Secondly, the bodice still seemed a bit loose, and like I could pinch out an inch of fabric on both sides.  Something went wrong, and it took me time to figure it out.

Until...

I had an epiphany!

I sewed a size 14 straight, with no changes.  By the measurements alone, my hips fit nicely, but it was way too loose in the bust. Since my body shape is a pear shape (small on top, wide on bottom), I needed to start with a smaller size on top and grade up to a size 14 on the bottom.

Granted, I usually do this, but somehow I must have gotten TOO excited and skipped this step.

Thankfully, I have refined my original pattern, and am cutting out my fabric and starting over.  I think I have enough info from my first muslin to skip a second one, but SADLY, I won't be able to participate in the Sew Together for Summer series.

Nevertheless, I am moving forward.  There will be other sewing challenges in the future.

Stay sew-filled!


Friday, June 16, 2017

Shirt Dress Muslin

Hello everyone!!

You would think that 21 days to sew a shirt dress would be more than sufficient, right?!?!

Well, here I am on day 16 still working out my muslin.  Once again, I will be coming in right at the deadline, and I don't know whether I will finish it.  But I did make a COLLAR:


Woo hoo!  It wasn't as bad as I thought it would be, but I must say that watching my Classic Tailored Shirt class with Pam Howard was so amazingly helpful!!!!  Pam Howard is such an awesome, patient, gentle teacher.  She made me feel a lot more confident about sewing a shirt dress even though this pattern isn't a TRUE button down, he he!  It doesn't even have a back yoke! But nevertheless, I press forward.

I haven't practiced buttonholes yet, so I know I will need Ms. Howard's expertise for those.

Here is what the muslin looks like on me:


It is SOOOOOOOO long!!!!!!!!! LOL! I mean, WOW!  I will definitely cut a good 4 or maybe 5 inches off the length.  I haven't decided yet where I want it to fall.  I will probably keep tweaking it until I find a length I am happy with.


I do think it is a cute shirt dress, though.  I am using advice from Nakisha (thanks so much), as well as a tutorial on converting button downs to sleeveless that I found here.  I really like a bias bound armhole, just figuring out how much of the upper armhole to cut off.

Here is a pic with 1 1/2" removed:


I hope that is enough for now.  I am going to make some bias strips tonight and see what it looks like with them bound.  I have been looking at inspirational pics on Pinterest, and I really like the pics that show a little more shoulder.  


I definitely don't want to have gaping, so I will be raising the armhole some.

Wish me luck!

Stay sew-filled!


Sunday, June 4, 2017

Simplicity 8337 Flounce top

Hello everyone!

I hope you are enjoying your weekend!

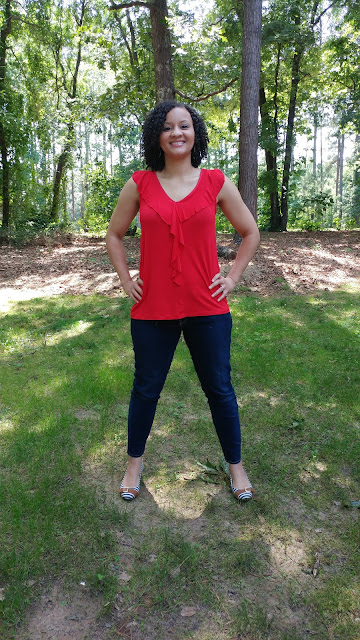
As promised, I am back with a review for Simplicity's 8337 Flounce Top.  I happened to squeeze this top in at the very end of last month!  And here are the results:


It's an awesome top!  In fact, it is so awesome that I didn't realize I have a very similar flounce top in my closet already.  It is a piece I purchased YEARS ago (2011 I think), and is dearly loved.  In making this version, I found my old version, and I have come to the conclusion that I really like this style on me. This is a throwback with me and my mom:

Isn't it funny how we gravitate towards the same style over the years?

Anyhow, the S8337 flounce top was an easy one to make.  I already knew the fit would be good, so most of my concerns were in constructing the flounce, and whether or not it would hang well.  I am happy to report that the construction was much easier than I thought, and the weight of the fabric I chose works with the flounce design.

Here are the details:


I sewed a size S, with the waist graded to a M.  I used a beautiful lightweight rayon jersey knit from Fabricmart Fabrics.  It was a fairly easy fabric to sew, and the drape turned out to be lovely.  Since the flounce edges are left raw INTENTIONALLY, you must be careful to choose a fabric with similar right and wrong sides.  It doesn't make a difference for the top portion of the flounce, but it does for the part that hangs at the center front.  Also, a rotary cutter will give a better edge when cutting out the pattern piece (shhh, I used scissors, lol).

*As a note, I am sure it would be possible to serge the flounce edges if you wanted.  I am not well versed in doing so with the delicate nature of my fabric, but it would probably lend a more professional look to the garment.*


I really don't have any dislikes, but I will say one thing I would do differently should I make another one--use my own binding for the neckline!! I used purchased binding, and it must be me.  I just don't like how it looks.  It looks cheaper than if I would have cut my own from my jersey fabric.  

By the way, I did use self fabric for binding the armholes (per pattern instructions), and I really like how nicely it turned out.  This is just a small pet peeve, but not enough to be disappointed with my top.  Also, my fabric kept magically growing on me!  I stabilized the shoulders, let it hang before hemming, and still ended up removing an additional inch in the waist to refine the fit.  Obviously, fabrics behave differently, and it is good to know how your fabric behaves.


Overall, this pattern is a total LOVE!  It will definitely go down as a TNT for me.  I am sure I will revisit this pattern in the future! However, for now I will be moving on to my June plans.  I would recommend this pattern for any confident beginner, or someone looking for an easy top with a little bit of flair!  Seriously, you could definitely sew this style in multiple colors!!!

Stay sew-filled!


Friday, June 2, 2017

May Re-cap, and June Plans

Hello everyone!

I am pleased with the way May turned out for me! It is pretty rare for me to sew four garments in a month, knowing all of the responsibilities of my life and home.  However, something happened.  Call it a "Christmas miracle", or a moment when "all of the stars align."  Yes, I was productive, yet I have no idea how it happened, lol!,

I'm sure that sewing from ONE pattern helped!  Here are my makes for May, with a yet to be reviewed flounce top (View A) added in the mix:


For May, it really worked to pick one pattern, sew it, and repeat.  It was calming to work with familiar instructions, and great fit.  Even though I was a little hesitant to sew the flounce version, those two factors worked in my favor while assembling this top.  I plan on posting a full review by the weekend so you will know my full experience for this version.

Me and my sweet girl
I have already worn my cold shoulder tops a lot this month, including one of them on my daughter's birthday so that we could be "twinning."  They are so comfortable, so trendy, and make me happy! This pattern is surely a TNT in that regard, and I will use it again in the future.


June Plans
What can I say about the month of June?  It holds a special place in my heart because of my birthday, but there are also loads of things I want to accomplish in this month as well.  If you are following along with my aspirations for 2017 (see tab), you will see that I am working my way through my goals, but still have a little ways to go.  This will be another month that I challenge myself to learn and grow.

That brings me to something fun that I saw on Youtube.  Apparently there is a big giveaway going on, associated with the hashtag "sewtogetherforsummer".  The catch? You must sew a shirt dress,and post it to Instagram with that hashtag in order to be eligible for the prizes.  When I saw this, I got so excited because button down shirts are on my list to sew, AND I have a Craftsy class for it.  So, I could technically cross two things off of my 2017 list by participating.  Hey, I may even win a cool prize!  Go HERE for details if you are interested.  

I am thinking of choosing between these two patterns:


Simplicity 8053, View A is a button down shirt that I would have to turn into a dress by adding some length to it.


Then there is this adorable shirt dress pattern I received with the Love Sewing magazine I purchased earlier this year.  View C is what I would make, however, I would have to figure out a different sleeve for the heat here in GA.

My stash is pretty limited when it comes to shirt dresses, but I am trying to use what I have.  If that doesn't work, I will buy a pattern on sale.  The deadline to sew one is June 21st.

Another project I want to start this month is a pair of Bermuda style shorts!  I have those on my list too, and while flipping thru my pattern stash, noticed these:


I just LOVE these in View C, and I have heard lots of good things about the Amazing Fit series.  I will definitely get started on these with the hopes of sewing a few for summer once I get the fit right. 

Ok, so last but not least, this pattern is on my radar:

 I already own it, but there is a small story involved with it.  I wanted to sew this top for Ms. Faye's TOPS THAT POP sewalong.  Only when I went to pull it, I could not find it anywhere.  I was so disappointed!! Thankfully, I was able to catch a 99 cents sale for Simplicity at Hobby Lobby, and I changed direction and sewed a cold shoulder top instead.  It worked out for the better, and I found the pattern under my couch the next week, lol!  Anyhow, this one will be coming out of the package soon.

Lastly, I am still sewing for my kids.  They have LOADS of projects lined up for me, lol!  My son wants pajamas, and I haven't had the chance to sew for my beanie baby yet.  My daughter always wants something, so I will see where projects for them get thrown in.

THANK YOU so much for reading along, commenting, and sewing amazing things yourself!  I am starting to feel a lot more comfortable in my sewing journey.  Yes, I still experience frustrations, but my passion for sewing is beginning to overtake my reluctance to stay at the same level.  And your encouragement is wonderful! So, thank you!

I will check back in with my review of the S8337 top soon!

Stay sew-filled!