Monday, March 25, 2019

Mccalls 7313 Two Ways

Hello everyone!

I meant to check in a few days ago, but I wasn't feeling the best, so I ended up dragging my feet a little on getting blog photos done.  Though I LOVE working with young children, between my toddler class and my own children, I end up taking a lot of Vitamin C to keep healthy.  That, and good old-fashioned handwashing, of course!  Anyhow, I am feeling better and I ready to show you my finished Mccalls 7313 dresses!

Today is another two for one!
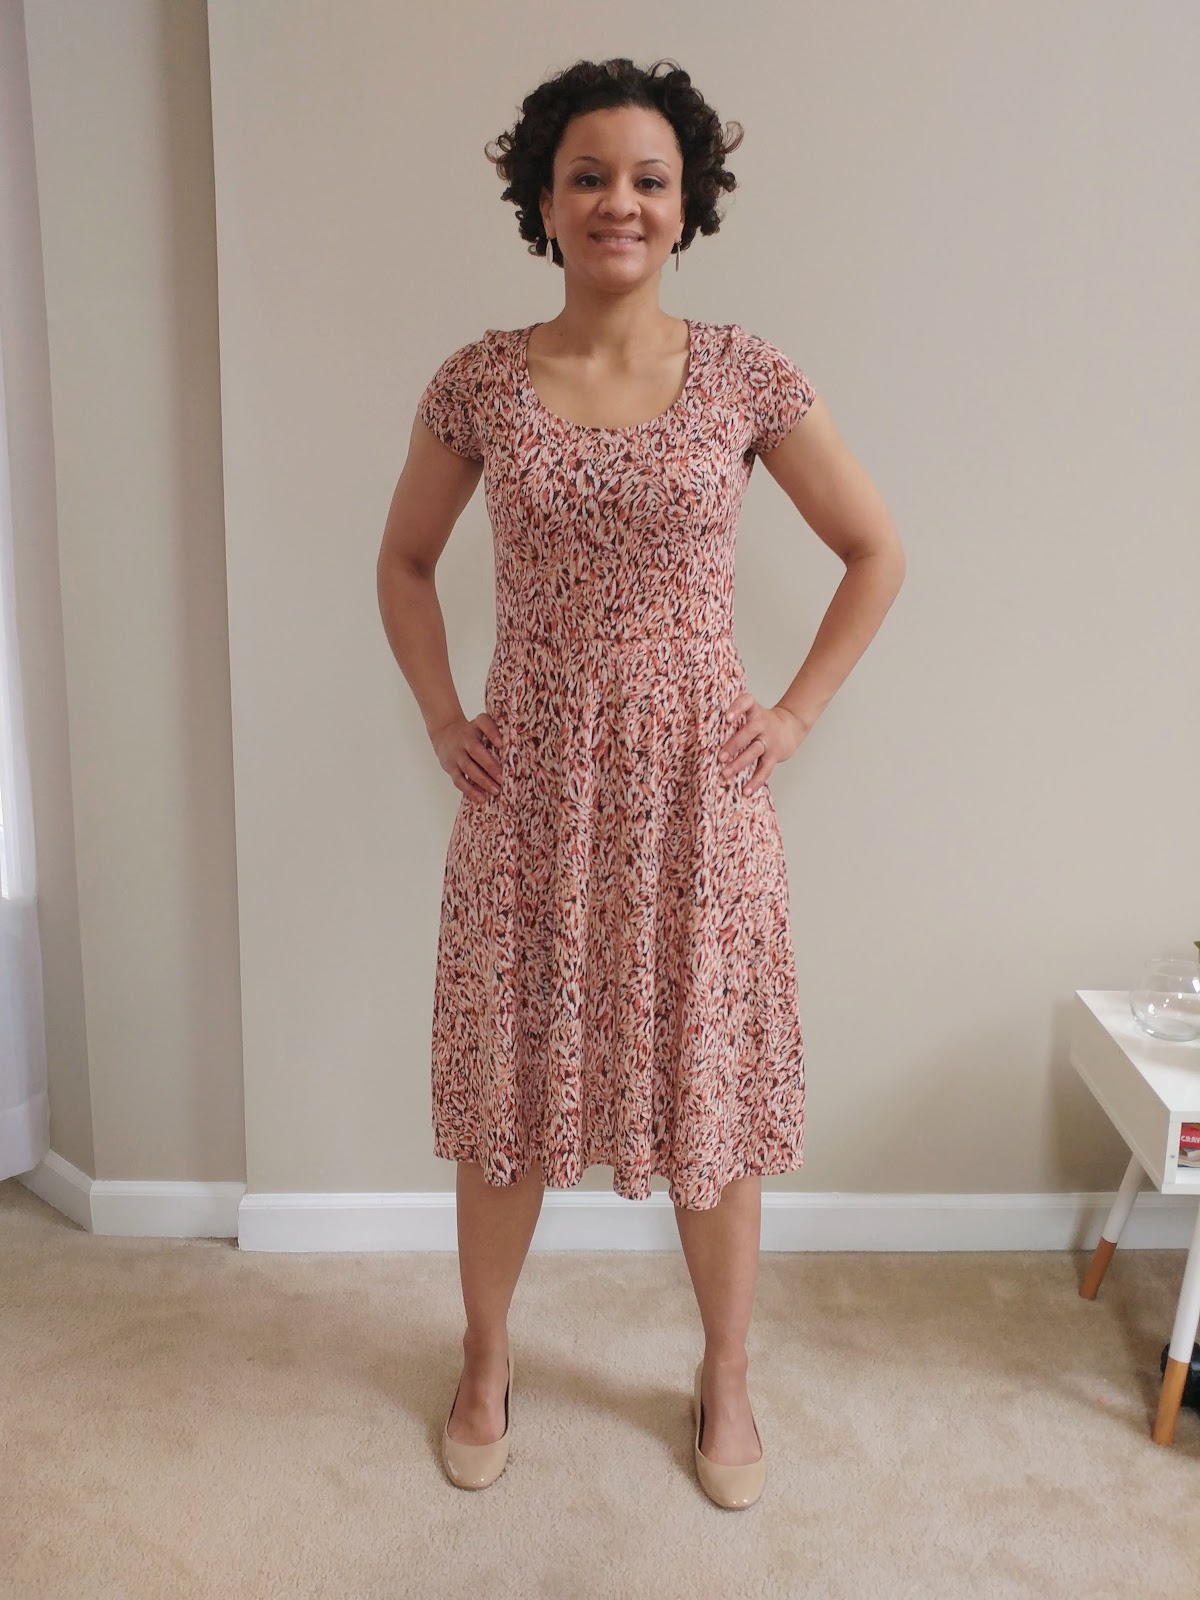
Here is the first version:


This is View E in a size 10 graded to 12.  It is made from a recently purchased jersey from Fine Fabrics, and I love it!  Everything about this fabric lends very well to this pattern.  It has nice drape, a bit of weight to it, and is not translucent.  I was able to serge this dress together in about an hour, and I love the cap sleeve--it is my first attempt to get Spring ready!

Another nice feature of this pattern is the hidden elastic at the waist.  You form a casing to insert the elastic, and it adds an ever so slight amount of cinching.  

To finish off the hem, sleeves, and neckline, I decided to use the newest addition to my sewing space--my Juki MCS-1500 Coverstitch machine!  Yes, I have moved into the world of coverstitching, and I am so very glad to do it.  I got my machine around a month ago so that I could achieve more professional-looking hems on the knits I sew.  I unboxed it right away, read a bit of the manual, then set aside a day to watch videos and tinker with threading and using it.

I had researched lots of machines, and as soon as I read that the Juki MCS-1500 was a dupe of the Bernina L220 model, I was intrigued enough to buy one.  So far I have been nothing but pleased with my choice!!  It sews like butter, and though my initial investment to learn the machine was great (three hours), I feel very comfortable using it now, and have even switched out the thread (it's easy).  


Here is my second version:


Now this fabric is one I purchased from Fabricmart Fabrics roughly a month ago.  It is a double brushed poly and, while I like the dress, it is clingy.  I made this version exactly the same way as my first dress, but you can definitely tell this fabric has much more fluidity to it.  Even though I let out the waist elastic more than the first version, I am still getting some gathering where I have none with the other fabric.  

I think I will probably wear a jacket or cardigan with this version.  It is not an absolute love for me, but I do like the color, and I can always use it with other items I already have.


Overall, this is a wonderful pattern, especially for beginners!! There are SO many different variations to choose from, and  you can mix and match the sleeves and necklines to create the dress you want.  As for me, I am happy to add two dresses to my Spring wardrobe!

Starting this week I will be turning my attention to the Sew Your View Mccalls 7906.  Can you believe I haven't even started it yet?  I hope it is a quick sew, since March is almost over...  I will check back in at the end of the week and let you know how things are going.

Stay sew filled!


Saturday, March 16, 2019

Simplicity 8750 Two Ways

Hello everyone!


I hope you are well!

I have to admit I have been under a lot of stress with renovating my kitchen.  There are many decisions to make, and it has been a bit more overwhelming than I thought it would be.  However, there seems to be a direct correlation between the amount of stress I am under, and my ability to sew.  The more I feel stressed, the more I sew--for now at least!  

So today I am delighted to show you Simplicity 8750 done in two different views.  I will start with View A, the slouchy turtleneck version:


I knew that I wanted a basic turtleneck done in a neutral color.  Since I already had this gray ponte knit in my stash, this was my selected fabric of choice.  I made a size 12, graded to 14, and added 1" of length for my long torso.  All the pieces are serged, and I love the final result.  It is a great staple that I will be able to mix and match other items with.  


The gathers on the yoke piece create a nice effect, and I think they would be so pretty with different applications like lace or colorblocking like Mimi G's version.  The only thing I didn't like was wearing the turtleneck unfolded.  It took up most of my neck, and wasn't very flattering on me.  If I were to make this again I would decrease the pattern piece size slightly so I could wear it unfolded.  

For the second version, I decided to revisit the V-neck, or View B:


Since I chose a basic fabric for my first version, I thought I would spice it up some with the V-neck.  So this is a jersey print I picked up at Fine Fabrics a few weeks ago while scrambling around there on a busy Saturday.  It is also size 12 graded to 14, with the same adjustments.  Again, I really like the soft gathers on the yoke.  I love this top too, and have already worn it!

For construction, I would like to talk about two things as it relates to this V-neck tee.  The first is the assistance Mimi G gives with creating the V-neck and getting it to lay properly at center front.  I think she does a great job of breaking down the three tips she has so that you can sew the neckband well.  I would add that I found that basting the "V" center seam of the neckband, and aligning it to the basted "V" at the center front of the shirt was SO helpful.  That is what I have done with my Renfrew V-necks in the past, and that helped here as well.


Secondly, have you heard of the clipping method for inserting knit sleeves into tops?  I certainly hadn't, especially since I make it a habit to sew my sleeves in flat.  Well, just for fun, and to learn a new way of doing things, I decided to give this method a try.  Since it came recommended by Mimi G, I figured it was worth attempting.  It is so great!!!  

I have had instances where the sleeve cap is a little higher and less rounded, and that makes it harder to set in flat for me.  With the clipping method, you apply small clips along the garment sleeve edge to create the additional spacing you need to ease the sleeve in.  You can see it explained here (skip to 7:25).  It doesn't take very long since you are only applying the snips in a small area.  I still prefer sewing my sleeves in flat, but will definitely use this method again in knits with a higher sleeve cap.  


As you can see, this pattern is pretty versatile!  You can easily create nice basics, or turn it up another level with a fun print.  

I will be back next week to show you Mccalls 7313!  

Stay sew-filled!

Friday, March 8, 2019

February Recap and March Plans

Hello everyone!

It was so nice to read all your lovely comments on my last post about Mccalls 7912!  I appreciate all of the well wishes, and thank you for them.  I would also like to welcome some of the newer readers to my blog!  I hope I can provide insight to help you in your sewing journey!

Today is a recap of February!!!  I set out to sew two patterns, and that is exactly what I did! 


I didn't even realize the similarity of the pockets in both styles, but I guess I had a small theme going here.  On the left is Simplicity 8790 , and on the right is Mccalls 7912.  The Simplicity tunic dress has been worn twice already, and I have plans to wear my "coat vest" this weekend.  I highly recommend both patterns!

For the month of March, I was super excited to see the Sew Your View sewalong choice:
Isn't it just beautiful?  I first saw this pattern as a part of a Youtube sewalong by Brittany Jones.  She made a black skirt in View C (I believe).  Her version came out so nice, and it immediately put this pattern on my radar. It looks like everything is aligning, and now I will be sewing the same skirt too.  

I love the length of View B, but I love the wide belt carriers for View D, along with the self tie belt.  I already purchased the pattern, but I sadly don't have enough yardage in my stash, so I will need to begin a hunt for a sateen, chino, cotton blend, or twill.  I would love to find a sateen!

Here are some inspiration pics of what I am thinking:


Left-H&M skirt   Center-Chic Wish Midi  Right-With Chic

In terms of my own wardrobe, I would love to sew a neutral piece, but part of me also wants to jump out there and make this skirt a statement.  Ok, I guess I mean part of me wants to just copy the pattern envelope, lol!  I will have to look at what I plan to wear with it, and go from there, so stay tuned!

The pattern I have chosen to sew for this month is Simplicity 8750.  Since the weather here in Georgia has been cycling back and forth from warm to cold, I thought a nice solid staple of View A's turtleneck would fill my need for a good basic.  I first saw this pattern made up on Tom Kat Stitchery's YT channel, and her striped version is so cute!  I may also make another top in View B.


Again, this wouldn't be a month of plans if I didn't include a few BONUS items.  I ran out of time last month to even start the pattern I chose for Black History Month, but I still want to sew it.  Thankfully, I have a lightweight ribbed knit waiting to be used, and all of my buttons have been purchased too.


My second BONUS pattern is an easy one that would help pad my wardrobe, and transition me into Spring--whenever the season decides to come around.  It is Mccalls 7313, a pretty dress with lots of silhouette options.  I have an olive brushed knit, and a blush/earth toned knit in my stash that would work well for this.  If I don't get around to it, I am pretty sure I will move this to next month's pattern choice.

Speaking of the up and down weather here, this past weekend was lovely weather with temps in the 60s, so I pulled out the Kalle Shirt I made last year. While at Target doing some Spring clothes shopping for our kids, I snapped a photo:


I am definitely still lovin' the Kalle!  It was nice to browse the stores, and I did see a few pieces that caught my eye.  One in particular was this sheath dress with a pleated detail on the front:


I didn't try it on, but I did look to see if I could find a similar pattern for it.  Unfortunetaly I didn't come up with anything, but if any of you know of a great pattern to make this dress happen, please let me know.  I particularly like the angles of the neckline!

I will be back next week to share S8750 with all of you!  

Stay sew filled!


Wednesday, March 6, 2019

Mccalls 7912

Hello everyone!

I cannot tell you how good it feels to be back today!  A few days of rest, healing and recuperation has done so GOOD! My hives have subsided, things are moving along with the renovation of our kitchen, and I am slowly finding a routine and rhythm for my family and me. 

Better yet, today is the day I can show you Mccalls 7912 and give you a review!


I absolutely love this vest version!!! Don't get me wrong, I think all the versions for this pattern are winners, yet I think I really needed this vest.  I didn't know I needed it, but the final results proved me wrong.  I am surely grateful to add this piece to my wardrobe!

I made View B in a size S, and graded to the M at the hipline.  I also lengthened the vest 1" for my longer torso, and did a 3/8" forward shoulder adjustment.  For fabric, I used a mystery woven in my stash that I purchased from Boho Fabrics about a month or two ago.  It came as a part of a mystery woven bundle, so I have no idea what the fabric content is, except that it is probably mid-heavy weight with a basketweave texture.  The color is a lovely cream blush that I thought would lend a classic feel to the vest.


My choice of fabric did become a little problematic as I was assembling the vest, since there was a lot of bulkiness to deal with when it came to the facings.  I serged the inside seams, and tried to eliminate bulkiness wherever I could.  I am happy with the end result of my affectionately named "coat vest."  


I really like the way the inside front facing and hem finish off for the vest.  I was able to handsew the hem to a mostly invisible stitch on the right side, so I was proud of that!  


The facings are hand sewn into the shoulder seam, and I somehow ended up with pieces that were a little short.  I was really maneuvering my pattern pieces around when I cut them out, so I think that had something to do with it.  So, I serged the edges to prevent raveling and then hand sewed the facing in.  


The self fabric belt is such a necessity, and I almost thought it would not happen.  I usually order all of my fabric cuts as 2 yards because I can mostly make a garment of that amount unless the project is more intensive.  So when I need to use more than that amount, I start by changing my pattern layout and that usually works.  I think this vest required 2 1/8 yard with the tie belt, and I squeezed the whole thing out of 2 yards.  I am not sure I will make this common practice because it doesn't leave much room for error (actually no room for error), but since I didn't have access to any more of this fabric, I went for it!!

My final touches for this vest involved a few well placed tacks near the front so that my facing would not fly open.  Overall, this was a wonderful project, and I am so glad I made it!


I will be back Friday with my wrap-up of February, and some sewing plans for March.  

*In case you are looking for Mccalls' sewing patterns, Hobby Lobby has them on sale for $1.99 this week.  

Stay sew-filled!

Saturday, March 2, 2019

My current situation

Hello everyone!

I hope you are well!

This week has been a whirlwind for me, so I apologize that I haven't checked in with you to show you my finished M7912.  It has been finished since Sunday, but I had a few things throw my blogging timeline off.  Here is a recent photo:


I am so excited to show you all the final look, and am sad that it will have to wait a few more days (details to follow).  Thank you for your patience, and I appreciate your support and comments from my last post!!  

I would love to let you know the story behind some of my delay:

Last weekend we had a company come investigate a leak in our kitchen, only to uncover mold.  The leak has been ongoing for who knows how long, and it was also the type that would have remained unseen to our eyes if our bottom cabinetry had not started to breakdown.  Needless to say, our family moved out of our home to stay with relatives until our insurance company could place us in a rental home.

And on Friday our prayers were answered for a place to stay until our kitchen can be renovated!! Thank you Lord!  


So this will be my sewing situation for the next month or so.  Yes, you know I brought my machines and gear so I can continue to keep up with my craft!! Besides, I have so many things planned for all of you and I didn't want to go on hiatus now. As soon as we walked into the home, there was a lovely small table in the corner of one of the rooms.  I feel like it was put there for me, lol!  I mean, I know it wasn't, but I FEEL like it was.  I am so grateful!

You see, my other hindrance to posting was a small health issue.  About 8 years ago I used to break out in hives at random times.  It happened so often that I finally began to connect my diet and make BIG changes.  Those changes helped me to avoid "contact dermatitis" until this week.  So, at this moment, I am nursing a red, angry, bumpy rash that encompasses the area around my mouth.  I am on medication, and hope to be closer to normal soon, but I am still pretty itchy and unsightly.  And yes I love ya'll, but not enough to get on camera looking like this, lol!!!  

Hopefully this will be my last bout with dermatitis; if not, I will have to undergo patch testing to determine the root cause of my condition, and I am not looking forward to that.  

Though this week put my family to the test, day by day we have been making it through.  I appreciate your patience during this time as I figure out how to process our new normal.  

I hope to be back soon!

Stay sew filled!