Wednesday, June 3, 2020

A Time for Change

Hello everyone!

I planned on writing a sewing post yesterday, but decided that participating in #BlackoutTuesday was a much better use of my time.  In case you missed it, June 2nd was a day to pause our normal interactions and posting online in order to raise awareness against systemic injustice, and stand against racism.  By stepping away from social media, the encouragement was to pause and learn, to seek out information and listen, and to become educated on inequality that has plagued our society for so long...  

I took the time to do some of those things, and to examine my own heart in the midst of this tumultuous time.  I can honestly say that I don't know how to feel most days.  With the death of George Floyd following so close after the death of Ahmaud Arbery, the pain has been too deep for me to even comprehend.  Some days have been filled with mourning, and others just walking around numb.  Is this the world my children will grow up and experience?  With all that I teach, love, and show them, will it be enough?  

I don't have the answers, but I am encouraged by the sparks of change that have been ignited.  My prayer is that all our voices would join together to fight this battle, and provide effective solutions for the problems at hand.  The important thing is that we would all resolve to do something, and not let this issue die out. 

If you are wondering what you can do, then this article is a great place to start: https://www.timeout.com/things-to-do/how-to-support-black-lives-matter.  

I plan on posting a May recap and June plans post tomorrow, but please know that this issue does not disappear because it isn't directly spoken about in my posts.  As a Black woman, wife, and mother, I am this issue.  I speak about this because the value of Black lives has been misplaced in our society. While I have always believed that my life, and the life of my family members has mattered, there have been times when we have been treated differently.  And there are certainly countless stories of unjust treatment rooted in deep ties of racism and hatred. 

Again, we are not powerless, and there is something we can all do!  

Thank you for hearing my heart today!  


Friday, May 8, 2020

April Recap

Hello everyone!

Today I am excited to go over the garments I sewed in the month of April!  


These tanks are an absolutely wonderful pattern by Winter Wear Designs.  I had been on a hunt for a tank pattern that uses very little fabric yardage so I could be more resourceful with my fabric scraps.  With warm weather moving in, I wanted to easily create a variety of basics to mix and match in my wardrobe.  This pattern is called the Starting Point tank, and I used leftover yellow cotton spandex from Denver Fabrics, and double brushed knit from Joanns.  


These two Seamwork tops turned out so much better than I expected!! I still have a Seamwork subscription, and have appreciated all the wonderful changes they have been making lately.  They have lots of intriguing patterns, and even created sewalong videos to help guide sewists. This Clarke pattern is one I have seen every time I logged in.  It is just so cute, and reminds me of the Ogden Cami by True Bias.  Since I don't own the Ogden, I decided to download it.  I lengthened the top by 7" so that it would not be cropped--especially since I don't have any high-waisted pants to wear them with.  I also raised the V neckline by 1.25 inches, and shortened the shoulder seam by 3/8".   

The top on the right in maroon is a mystery fabric.  I bought it from Walmart, and it has little stretch and doesn't ravel.  However, it feels like a woven.  I haven't hemmed it yet because I need to buy a suitable thread color to match.  The striped top on the left is a knit, and both are made in a size 2.  I loved the versatility of being able to use either a knit or woven, and still get amazing results.   I am definitely making more of these!! I have an animal print rayon challis that would suit this pattern well.


The next top is one I included in my April plans post.  It is a Burda pattern, and while making it I fell in love with Burda all over again! I love the way it is drafted, and the fit is very nice.  This is a size 38 done in a double brushed knit from Fabricmart Fabrics.  I am not entirely sure that the sleeve knots flatter my broad shoulders, but the pattern is well worth the sew if you like this style.  It has definitely made me open to putting Burda patterns back in the rotation again.  I still lean heavily toward Simplicity, but I am always open to trying something new.


These two tops are Kwik Sew 3766 again.  I have already worn both of them and I just love this top! 


And of course I cannot forget my newest find for scrapbusting my knit fabrics--the Megan Nielsen Acacia Undies!  I have worn every single pair of these, and I love them so much! Adding a little more fullness on the back pattern piece was a perfect solution for added coverage for me.  It is such a pretty use of fabrics I have on-hand, and a little goes a long way.


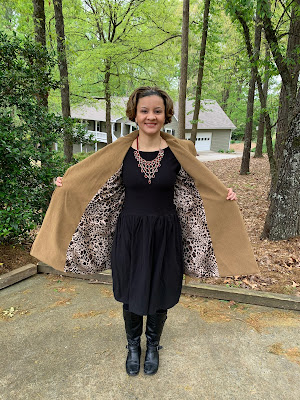
Last, but not least, I finished my Simplicity 2311 (OOP) coat! Before I put it away for Fall, I let it hang on my dressform for about a week, lol!  It will be nice to dig it out at the right time.

For my May plans, I will roll over a lot of the things I didn't get finished, and start on my next jacket, Simplicity 8418, a bomber jacket.  I had to order a few things to get ready for this project, but I now have what I need, and look forward to starting within a week or so.  My current sewing mood has been a lot more relaxed, and I am easing my way into this month.  I might start a quick and easy project first before I really dive into another jacket.  Also, I really need to start filling in some gaps for more bottoms, even if they are more simplified versions.

So overall that makes 7 tops, 6 undies, and 1 coat!  I am grateful for what I have accomplished, and look forward to how this month will unfold.  I hope you have wonderful expectations for your sewing too.

Stay sew filled!


Monday, April 27, 2020

Megan Nielsen Acacia Undies

Hello everyone!

I hope you are all well! 

Here in the state of Georgia Governor Kemp has initiated the process to move out of our homes and restart the economy.  As for me and my family, we have kept things much of the same for now.  I am still doing weekly grocery runs, schooling my kids via online, and keeping a low profile.  Thankfully, my husband is still able to work from home, and I do get some blocks of free time to sew.  So, we are hanging in there day by day.  I have even started my own personal "to do" list for things around the house that I never really get to.  I have effectively organized two closets, our laundry room, and a couple of drawers.  More Spring cleaning still needs to happen, but I am glad that I can take my time and do this at a slower pace.  Hopefully when Corona is a distant memory, I will have a tidy home with a complete Spring and Summer wardrobe too!

Today I am here to talk about a pattern I recently tried.  A couple of years ago I downloaded the Megan Nielsen Acacia Undies as a result of signing up with her newsletter.  I never used it, but had it available for the day I would.  Recently, while watching Whitney on TomKat Stitchery, she did a video on this very pattern.  In it she gave a tutorial for three types of finishing for the undergarments.  As soon as I saw the knit bands I knew I was IN.  I have LOADS of scraps from past projects, and I was curious  about whether I could achieve a proper fit with extra junk in the trunk.

This pattern did NOT disappoint!!!


The size Medium was perfect for me! I made the first pair without any modifications, and they still fit better than my own underwear.  For the rest of the undergarments I increased the sides of the back leg opening in order to add a little more butt room.  I now have a pair of undies that fits better than any I have ever bought! Probably the best perk is that this pattern requires very little fabric yardage to make.  My size required 11 inches for the front and back pieces. If you decide to create the knit band, you will require a bit more.

Pattern Specs:
  • Low-rise bikini cut with a beautifully enclosed gusset on the inside.
  • FREE when you join the Megan Nielsen newsletter
  • Only 8 PDF pages to print
  • Use elastic, lingerie elastic, foldover elastic, or knit bands (via TomKat Stitchery)
  • Fabric Used: Double Brushed Poly, Cotton Spandex, Cotton/Rayon Knit, ITY, French Terry 
  • *I really like the way the ones with DBP came out, and I was surprised that the French Terry and Cotton/Rayon Knit lay beautifully once finished.


Spoiler Alert! If you choose knit bands, you create your own for the waist and leg openings.  This is not included in the pattern, but are recommended specs by Tomkat Stitchery (unless you draft your own). The waistband she uses is 85% of your waist measurement x 2.5 inches.  

The leg openings are 85% of the leg opening circumference x 1 inch.  I used 1.25 inches because I found 1 inch to be a tight fit. Please refer to the video tutorial for more info and tips on elastic.  


For future versions, I will continue to use knit bands, however, some lacy or picot-edged ones are in the plans too!  I am so glad I finally printed out this pattern and gave it a go! It is stellar, and will be used for resourceful scrapbusting!

Stay sew filled!


Monday, April 13, 2020

Make Nine #1 Complete!

Hello everyone!

I hope you had a restful Easter holiday.  My family and I enjoyed watching church service online, and still kept some semblance of normal in spite of staying at home.  My husband BBQ'd, and we had an Easter egg hunt for the kids, even though my two oldest have almost outgrown this (13 and 10).  It was still a lot of fun with some of my favorite people!

For today I am here with some off-season sewing!  I have finally completed S2311 (out-of-print), the first of my Make Nine outerwear challenge!


This coat has been in "time-out" since February because I couldn't figure out how to fix the pocket gaping I encountered once I cut into my fashion fabric.  I made a muslin, but did not put pockets in that version because I didn't think it would be an issue.  I finally decided to pick this coat up and see what I could do.  My solution was to let out the back and side seams by 1/4".  This helped some, but the ultimate fix came with hand stitching the pockets toward the front of the jacket.  This made them lay flat, and made me happy.

Handstitched at the front facing seam allowance

Coat Details
Size: 14 with 1/4" grading from waist to hip, 1" length added
Fabric: Jacketing from Fashion Fabrics Club/Denver Fabrics
Lining: Animal Print Dobby Crepe from Fashion Fabrics Club/Denver Fabrics
Interfacing: Easy Knit from Joanns in Black
Shoulder Pads: 1/4" thick from Wawak

The instructions for this pattern were something I was warned about when I read reviews on PR.  Lots of reviewers said that they were difficult to follow, and they were right!  I would say that they were much like following a maze.  You read a few steps, do them, then jump to other numbers.  Do those numbers, then jump to another section.  Depending on the elements you wanted in the coat (Project Runway pattern), you had to adjust accordingly by skipping certain portions.  All in all, it is very confusing.  If this were eliminated, the process would certainly be easier.  However, this is not a hard coat to make.  Once you find the set of instructions you need, it is very doable.


For design elements, I decided to include the belt loops for the back and sides of the coat.  I planned to wear it with a belt, and knew I would want them.  I have another black trench with a similar look, and they were easily removable if they didn't look right.  I am so glad I added them!  It adds to the finished look of the coat, and it still looks nice if I wear the coat untied too.


Here is a look at the shoulder pads.  I catch-stitched them onto the shoulders, not sure if I would like them on my frame, since my shoulders are already so broad.  They worked great! I love the gentle shaping they add, and it really accentuates the seams of the coat.  


This is the completed lining with the front facing attached.  The sleeves are brown because I mistakenly ordered 1 yard of the animal print lining, so I had to make it work with the lining I had in my stash.  Thankfully, this adjustment didn't affect the final result of the coat.  I did, however, forget that I let out the seam in the back, and did not account for that in the lining.  It was already serged, so when I sent to sew the lining and coat shell together, I had to attach another small strip to the edge in order to fit my lining comfortably.  It is not a glaring thing you notice, but I am glad the print is busy, lol!!


Here is my coat just before I stitched up all the layers.  Surprisingly, my machine handled the layers well, and didn't give me fits about it.  The final steps after this are to sew around the perimeter, stopping at the marked dots on the facing.  Then, sew 1/2" below the dots on the bottom of the coat, leaving an opening to turn the coat right side out.  After some handstitching, and optional topstitching (which I definitely did), this coat was complete!


I just love it!!!  This coat pattern was in my stash a LONG time, and I have wanted to make it for a while.  The moment I put it on, my husband looked at me and asked "So, when are you gonna wear it?"

Well, that's the thing with off-season sewing... the satisfaction is not immediate because it is not an item you can wear right away.  However, you can bet that once Fall comes, this coat will be the first thing I look forward to putting on!  Thankfully, we had a mild day in the 60s, so it wasn't too bad to take photos to show you.  

Here it is with my Colette Moneta dress, and boots added for a Fall look:


It has been a slow start on my Make Nine, but I am glad to say I have ONE down, EIGHT to go!!!

Stay sew filled!